At the time of this writing, Qtractor was listed as Alpha Software...meaning pre-beta...meaning that there are functions that are not yet implemented and other functions that may or may not work. Even so, Qtractor has proven, for me, to be a stable and capable editing environment for sound. From a programmer's perspective (or as much a programmer's perspective that I have, not knowing how to program myself...yet), the application runs smoothly, takes advantage of many of the cutting-edge advantages of the Qt4 toolkit, and seems to have already, in its brief life span, caught up to other popular audio editors in functionality.
So, from Qtractor you can expect a good audio editor, but do not expect a finished product...yet. Also expect that in the future this application to become the premier audio editor for Linux!
Note that this tutorial covers only audio editing, not MIDI input or playback. I have done a separate tutorial on soft synths. When I originally did this tutorial a few months ago, there was no LADSPA or VST support in Qtractor. Happily, a few months later I've downloaded and installed the latest version and full LADSPA and VST support is included, along with lots of other cool new features. Heartening to see a project so actively developed!
To install Qtractor, you first need to make sure you resolve any dependencies it requires. There are obvious ones; you should have Qt4.5 installed, which you probably already have if you are running a KDE desktop but you may not have if you are running anything else. The package manager of your distribution should have KDE 4.2.x, so you can add it from there if you need to.
You should also have JACK (Jack Audio Connection Kit) installed; the easiest way to do this is to install qjackctl, which brings in all the major dependencies like jackd and provides you a Qt-based GUI should you ever need to interact directly with Jack. If your system uses Pulse Audio, then you should also install pulseaudio-module-jack.
Depending on your specific audio needs, you may want to also take this time to create a more robust Linux sound machine for yourself. No audio editing system should be without gstreamer plugins, mplayer, sox, LAME, ladspa, calf, and so on.
Once your system is truly ready for audio editing, you should download the latest source code from qtractor.sourceforge.net and compile it:
There are three columns in qtractor. There may also be a pane at the bottom called "messages" which you can safely close unless you are debugging or troubleshooting the application. Otherwise, the leftmost column is the track list; this is where the track names and controls will appear (note that if you are accustomed to hardware mixers, you may think of this as a "channel" list). The middle column is where all your audio clips will appear once you start building your project. The rightmost column is your file bin, which will list and help organiz ell the samples and clips that you bring in to use in your project.
Speaking of bringing in audio clips for a project, go ahead and right-click in the file bin. This will bring up a menu containing file-related functions, including "Add Files". Click "Add Files" and select some audio you want to use in your sound project.
After you've added some or all of the files you will be working with, you can organize the files by adding Groups (right-click in the file bin) and you can even see all kinds of details about the files themselves by scrolling right in the file bin. The sample rate, number of channels, and much more is listed as file attributes for each sound clip you've added.
Before we start editing, some customization of the qtractor interface is prudent. By default, qtractor comes with a number of helpful keyboard shortcuts but there are some key features that lack a keyboard shortcut assignment. Most importantly, the SPLIT function, which allows you to cut an audio clip in two pieces, has no shortcut assigned. In most professional applications, single-key shortcuts are used (as opposed to control+key or alt+key), so for SPLIT I assign the "s" key.
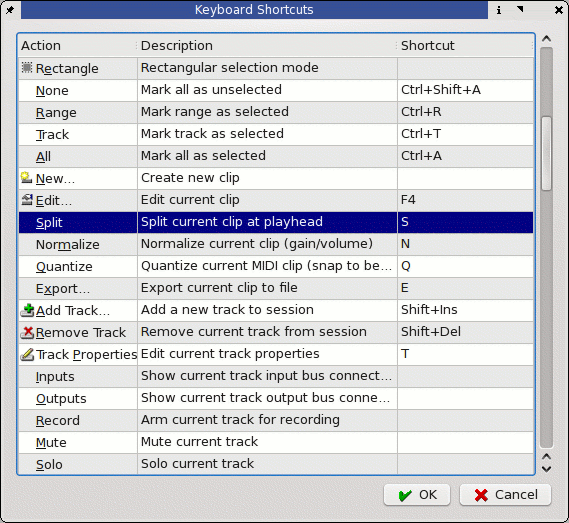
MUTE and SOLO and RECORD-ARM do not have keyboard shortcuts, either, so you may want to add keys for them, like Shift-M, Shift-S, and Shift-R. In fact, many of the keyboard shortcuts either aren't assigned yet or simply don't match what I feel is appropriate based on other editing applications I use, so you may want to take some time to customize these for yourself, or you may also simply download my configuration file and copy it to /home/user/.config/rncbc.org/Qtractor.conf
Now it's time to string some audio together. To do this, simply drag and drop an audio file from the file bin over to your workspace (the middle column).

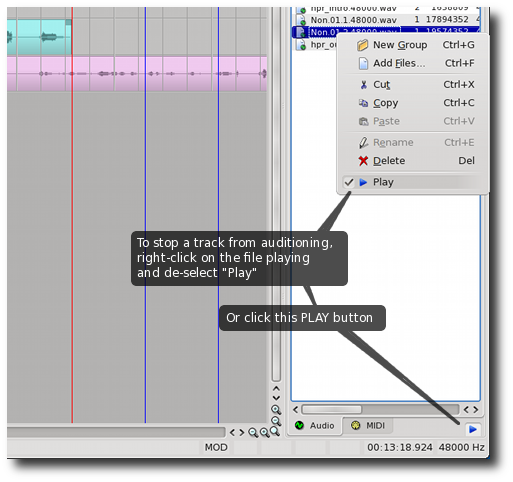
By default, an audio clip plays or "auditions" when you drag it over to the workspace. I can't figure out how to make this function not the default, but to stop it from auditioning, you can right-click on the clip in the file bin and deselect PLAY. Alternatively, you can click the PLAY button at the lower right of the file bin.
Editing Audio
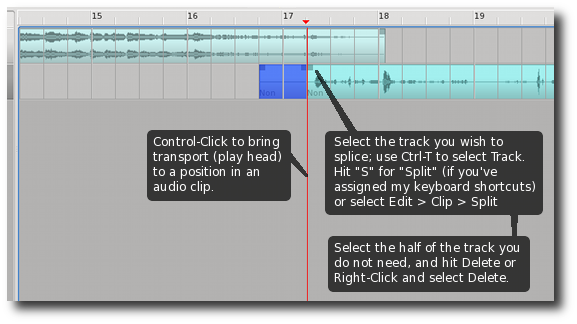
One of the most basic functions of audio editing is splicing, or "splitting" in qtractor; that is, cutting out unwanted sounds or cutting off periods of silence. To make a splice in an audio clip, you want to position your playhead to the point that you need to split. To do this, control-click in the gray area of the workspace, at the point that you need the play head to jump to. Go ahead, try it. After you control-click in the gray area, a red transport (play head) will appear where you clicked.
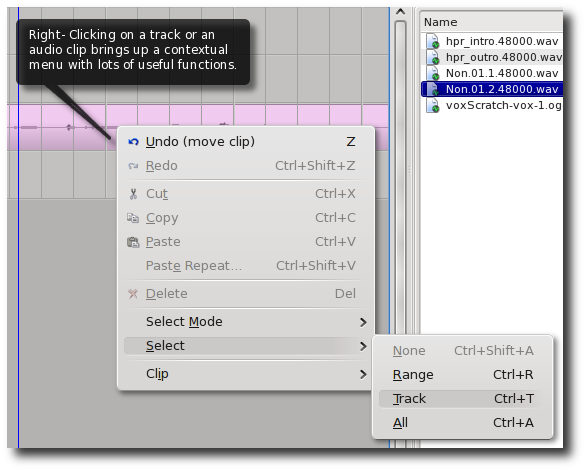
Now select the track you want to split. This may seem redundant if you have only one track in your project so far, but if you have 8 tracks or more, you obviously will want to define which of those are going to get cut into two. To select one track, either hit control-t or right-click on the track and select "Select Track".
And now simply hit "s" to split.
Note that qtractor is not really a waveform editor as much as it is a sequencer. For detailed waveform editing, you'll want to use Audacity -- for instance, in my own podcasts, I use a cheap microphone and no pop filter, and typically create all kinds of ugly distortion when I say any word with a plosive. To correct these errors, I'd be better off using Audacity, in which I can zoom into the waveform down to the sample level (literally) and do whatever I need to do. Once my sound has been cleaned up, then I could take it over to qtractor to sequence all the clips together. In reality, it's too much trouble to use two applications for just a little podcast that 25 people listen to, and for the most part I'd just make do with either qtractor or Audacity alone. But when you're doing serious audio editing, you may find the need for one application to clean your audio and another to sequence and mix it.
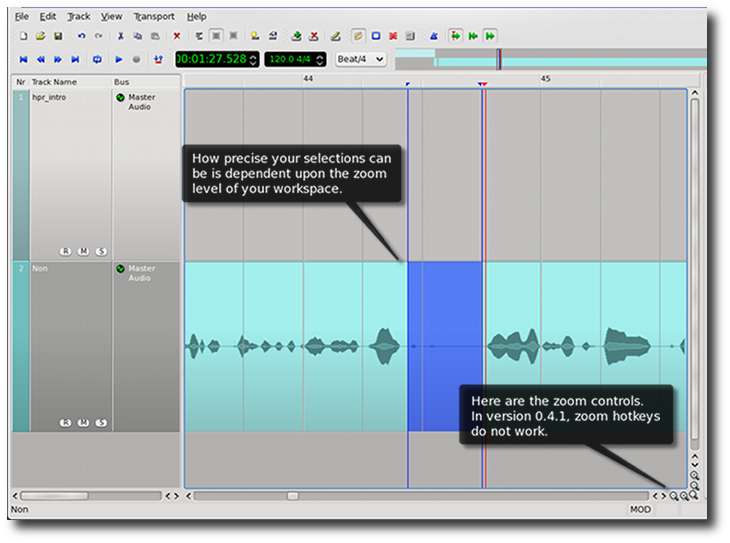
Having said that, there is a way to zoom in for detailed editing. You may need to do this if there is a sound you need to cut before or after but can't seem to select it when you're zoomed out. In version 0.4.1, it seems that the keyboard shortcuts for zooming do not work, so your only method of zooming in and out are the zoom buttons in the lower right of the workspace.
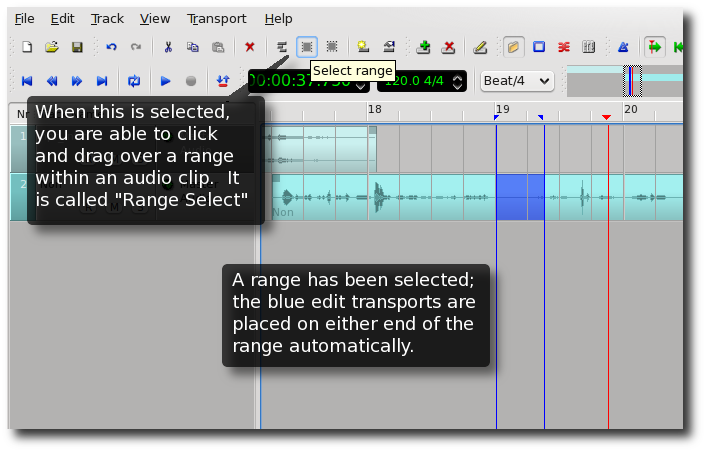
This brings up a point about selections. Sometimes you don't want to make just one split, but two so that you can cut a section right out from the middle of a clip. This is done the easiest using the Range Select function. There are actually three states of selection; Clip, Range, and Rectangle. Select Clip will select an entire clip from In to Out point (ie, from split to split, or beginning to end if it has not been split). Select Range and Select Rectangle are defined as having different functions in the manual (admittedly a work in progress) but in practise they seem to do exactly the same thing; and that is, they select a range within a clip. Simply click and drag to select the range you wish to highlight. Once selected, you can hit DELETE or CUT to get rid of it.
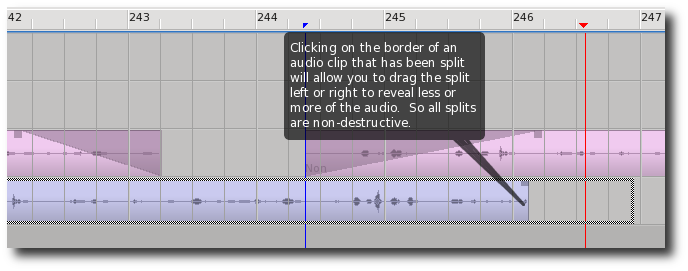
A note about splits and cuts and deleting things: this isn't Audacity, which deletes sections semi-permanently (it's permanent for that session; in order to get it back you would need to import the original file into that project again). This is non-destructive editing, so anything you cut away can be easily regained by simply extending the remaining clip to the left or right.
As you build up your project by adding more audio clips, you'll want to start mixing the project. "Mixing" is a broad term that encompasses practically everything you do in an audio workstation but generally speaking it has a lot to do with setting the volume levels of all the random audio clips you are stringing together into a project. There are many facets to even this, so let's examine three.
First of all, there is the matter of adjusting an individual clip's volume level. This is something I do frequently because my cheap microphone tends to record a bit soft. If you right-click on a clip and select PROPERTIES, a dialog box will open with all the different things you can do to that clip; if you select a number of clips at the same time (or an entire track) and right-click on any clip, your changes will apply to every clip you have selected.
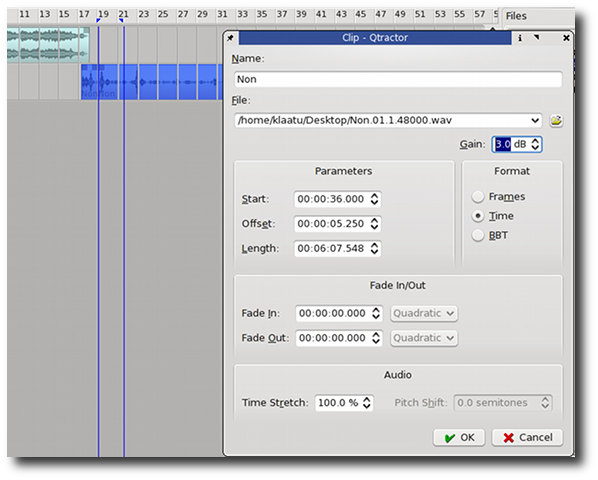
This dialog box has a number of options, as you will see, but to raise the overall volume of the sound, you can apply GAIN to it, which indescriminantly boosts the levels of all data in the clip. (This means that the noise will also be boosted, which technically is bad practise but when you have levels that are too low you have to boost them somehow.) Pitch-shifting is also here, as are fine-tuning controls for where the clip begins and ends. The point here is that some important functions that you would normally go to the Effects Menu to find in Audacity are built in to Clip Properties in qtractor.
Another way to mix in qtractor is with the Mixing window. This can be found in the View > Mixer or, in my configuration, by pressing the "M" key.
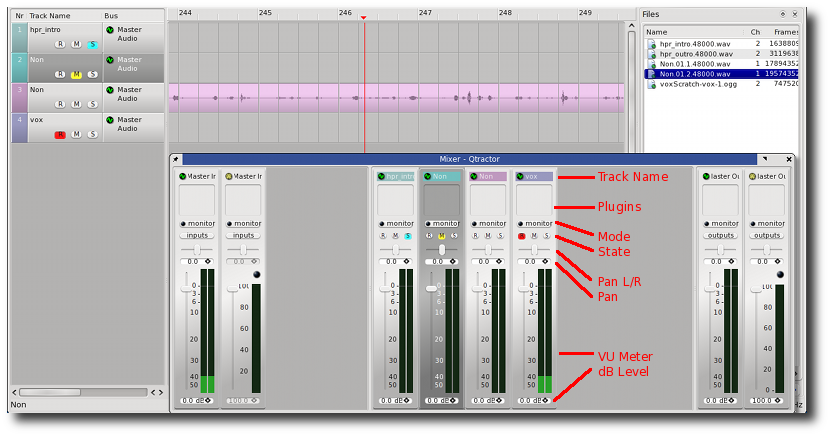
The qtractor mixer is a fairly standard soft-mixer interface, with one important thing missing: keyframes or "automation"...one can assume this will be a future feature since automation is badly needed to perfect a software-based mix. What the mixer does have is a list of plugins assigned to the track, the pan/pot position of the sound (how far left or right the sound will play; this is something you the mixer decides upons), a VU meter of the sound as it plays, and the peak level for the sound. Mixing is fairly intruitive; you simply need to set the levels of your audio so that there is a steady volume across the project, or start building up to a crescendo at the right time, or whatever your goal is. Without automation, anything very fancy is difficult, but the mixer as-is provides a good visual interface and the all-important meter monitoring so that you can make sure your project isn't full of unnatural volume fluctuation.
Alpha Alert! --> Currently (0.4.1 as of the time of this writing) the plugin function is not working. This means that while you can right-click on the mixer interface and choose "Add Plugin", qtractor will not allow you to add a plugin from your system. I believe this can be solved by compiling from SVN but I haven't tried this yet.
The third way of adjusting clip volume is with the built in fade-in and fade-out handles. These are very convenient, and would be even moreso if they were not constrained to being only for fading in and out; it is my hope that they will be expanded to be full-fledged mixer automation. But for now they are fades, and very easy to use; simply click on the little square handles in the upper corner of an audio clip and drag either left or right; a linear fade will be created.
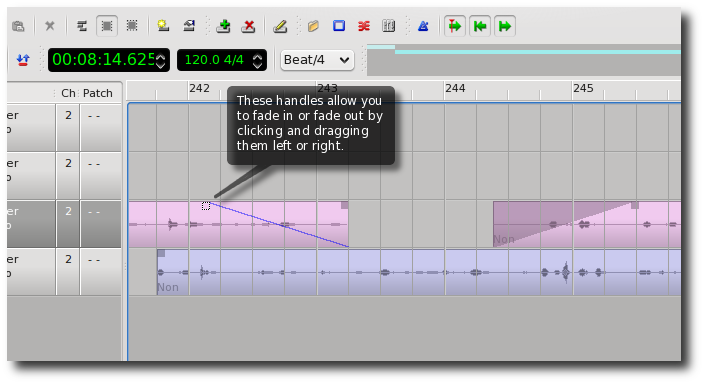
Currently there is no way to have anything but a linear fade. It is also worth noting that the value of your fade can also be adjusted numerically in the Clip Properties along with Gain and In/Out points.
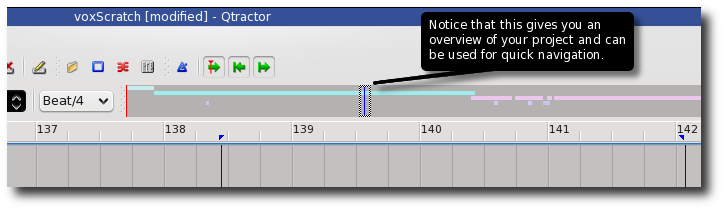
As your project grows in size and complexity, you'll find yourself scrolling back and forth a lot. One can get lost in a long project. Luckily there is a navigational timeline at the upper right corner of the interface. You can use this as a visual reference for where you are in your project, and also click around on it to quickly navigate to an area you know you need to work on.
Some functions for helping you deal with your project's complexity are found both in the Mixer window as well as the track list on the left column of the main interface. These are the Mute, Solo, and Record-Arm buttons. I assign simple keyboard shortcuts for these; Shift- M, Shift-S, and Shift-R. Mute silences its track. Solo plays only its track and mutes all others. Record-Arm prepares the track for Recording. Note that these track states are also available in the mixer window, as well as via a right-click on the track or the audio clip in the track. Yes, like all good pro applications, there are never any fewer than three ways to do any given task.
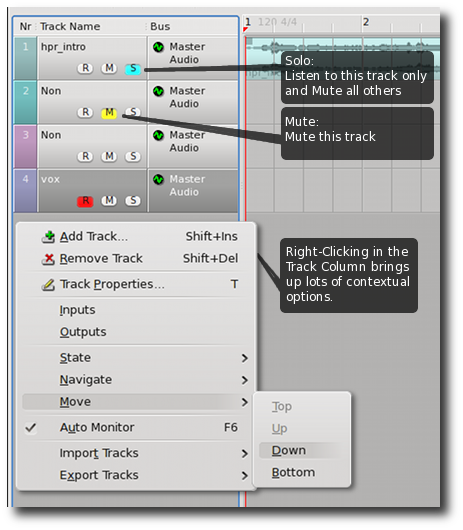
Remember that right-clicking on a track gives you many options that will be useful, like moving tracks up or down the list (useful for visually grouping tracks that logically go together), renaming the track, and so on.
Recording
There are two classes of recording into qtractor; there is Recording and there is "Punching In" or "Looping". The former is to record a completely new track, while the latter is to replace a portion of existing audio with something newly recorded.
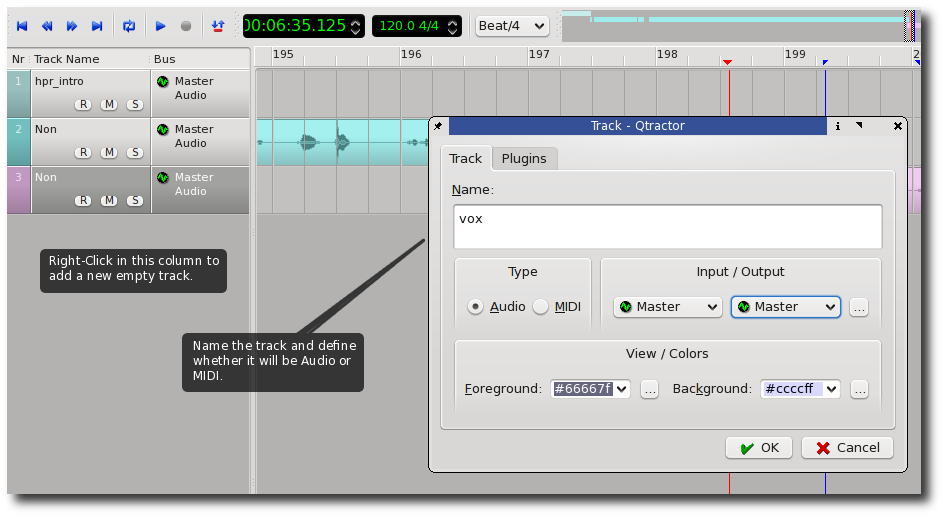
To start a new recording, you first must create a track for it. Of course, there are three or four different ways of doing this; right-click in the track column and select Add Track, or select the Track Menu > Add Track, or click the Add Track button in the toolbar, or use the default hotkey Shift-Ins. However you do it, you will be presented with a Track Properties dialog box next, where you can name the track and define whether you intend for it to be Audio or MIDI. Choose Audio and leave the defaults for everything else.
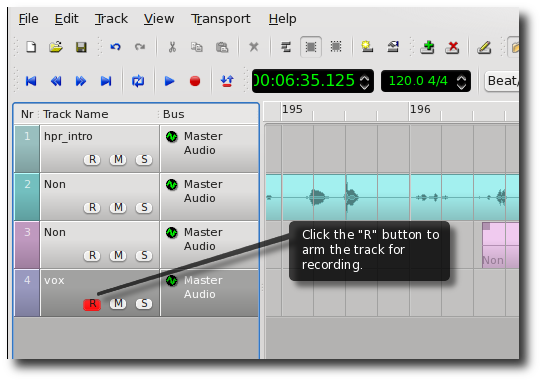
Now you need to arm the track for recording. Once again, if this is the only track you have in your project, this seems like an unnecessary step, but if there are multiple tracks and you want to record, qtractor needs to know the intended target for that recorded data. Arming a track for recording is essentially setting the target for what you are about to record. You can arm a track for recording by clicking the Record-Arm button, or right-clicking on the track and setting its State to Record, or using a user-defined hotkey (I use "Shift-R").
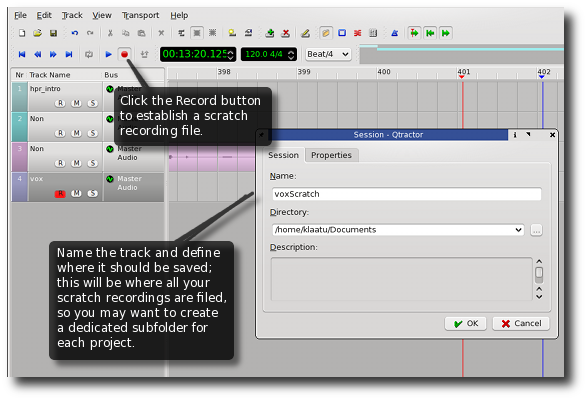
Next, click the "Record" button in the button toolbar at the top of the interface or use a user-defined hotkey (I use 'R'). The first time you do this in a project, you will need to establish a location for scratch recording files. After you've established that, all recordings done within that project will be placed in that location. It is not advisable to establish one big qtractor-scratch directory for use with every project you ever do. Make a new directory for every project; it's more organized and more efficient later on.
The final step is to press "Play" in the toolbar, or hit the Spacebar, and the recording will begin from wherever the play head happens to be. Press "Play" or Spacebar again to stop recording.
Before we cover the second kind of recording, called Punching In, we should should talk about Inputs and Outputs. The recording we just tried worked for me because on my computer, qtractor (well, actually it is Jack) automatically picked up my sound configuration and directed the input from the internal microphone to qtractor. If I'd needed to change this configuration, there is an easy way to do this from within qtractor: go to View > Connections, and a Connections dialog box will appear.
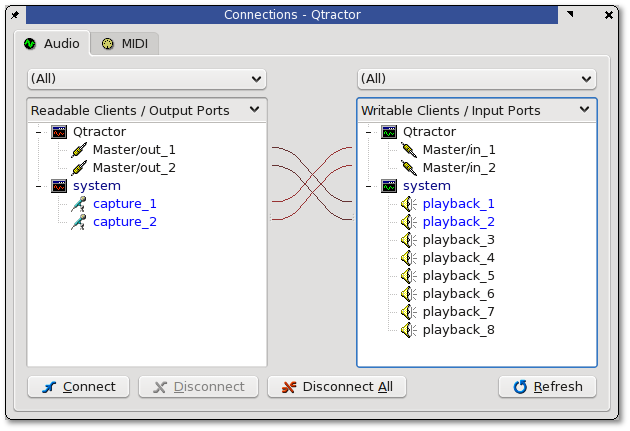
You may have seen this before; it is the routing system used for Jack, so you could also do this independently of qtractor with qjackctl, although with qtractor open it is better to do your connection routing in qtractor. Either way, the interface is the same; on the Left you have your available Outputs -- ie, something sending a signal that your ears want to hear. On my computer I have two groups: Qtractor and System. The Qtractor Outputs are the Left and Right channels of any audio I have in qtractor...so I need to send that to some physical device on my computer that will allow me to hear it when I press "Play". Make sense? This is where the Right Column comes in; it contains the Qtractor and System Inputs, or, some place that I want to send sound. The System Input is an imaginary port that means "whatever the system is using for sound playback" -- in my case this typically is my laptop's internal speakers.
The System Output in the Left Column on my system is the Capture source of my Computer. It's a bit odd at first to think of a Capture source, like my computer's internal microphone, as an Output but to Qtractor, that's exactly what it is. You, the human, are dumping sound into your Microphone so the Microphone to you is an Input device. But now the Microphone wants to dump that sound into Qtractor, so it becomes, to Jack, an Output device spewing out data that needs to be placed somewhere. The Right column defines where that data gets placed, and that is the Qtractor Master-In, left and right channels.
It has always helped, for me, to think of each unit as a physical device as if though you were not using a software-based recording studio. If I have a Neve microphone and an Emu Sampler, the Neve will have one output cable, and the Emu Sampler will have at least one input and two outputs. Taking the mic cable and plugging it into the input of the Emu makes sense in the hardware world; and it makes sense in Jack, too, if you think about it that way.
Now for the Punch-In. Frequently when people record something, there are a few bad bars here and there. Rather than recording the entire thing over, it's a common trick to "Punch In", which basically says that, for instance, a singer can just sing along with the song and the engineer will hit Record just long enough to re-capture that one or two bad bars. For me, as a simple podcaster and fumbling musician, punching-in is a great way to revise a statement I made in the original recording, or to re-do a few bars of music that I might have played wrong. In practise, however, I rarely record on the same equipment that I edit on, so punching-in usually doesn't work for me, because the mics involved are just too different. But it's a good trick to know, and it's what the pro's do...so here's how to punch in qtractor.
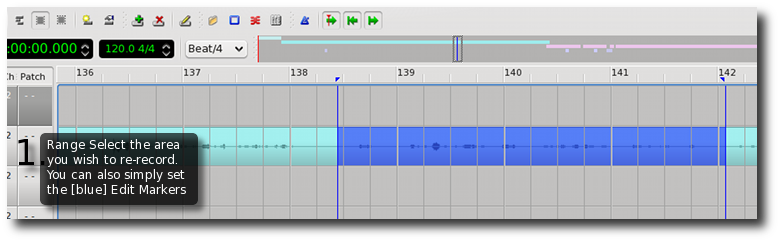
First, you need to Range Select the area that you need to record over.
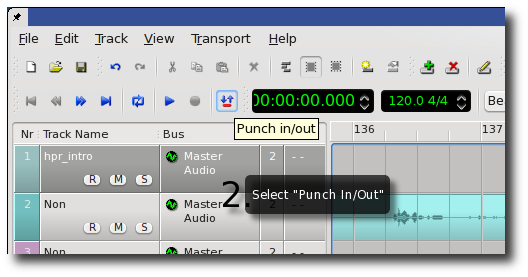
Then you need to set the upcoming recording session as a Punch In/Out session. Do this by click the Punch In/Out button in the toolbar. This will make it so that qtractor records only when the playhead is within the range you have selected.
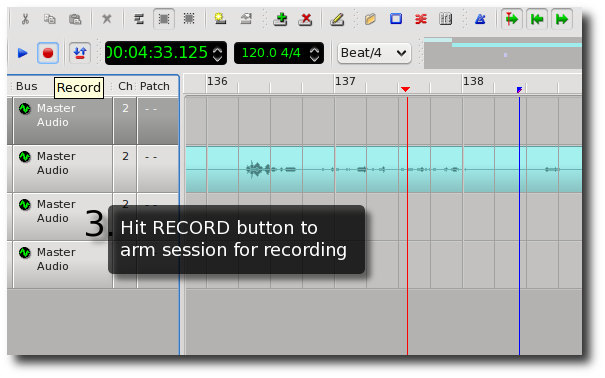
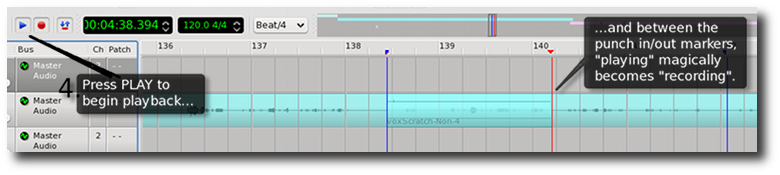
Arm the track for recording (I use 'Shift-R'), and hit the Record button (I use 'R') in the toolbar. Be mindful of where your play head is located; what will happen when we actually start recording is that qtractor will start playing from the current play head position -- but it will not record. This allows you to sing or speak or otherwise perform along with the good parts of the recording, and then once the playhead hits the Punch In point, qtractor records. After the play head passes the Punch Out point, qtractor stops recording and continues playing. If it is a matter of adding some spoken word, I typically set the play head just a few measures ahead of the Punch In point; I don't need much warm up to re-do some simple dialogue. But if it's music, then I need much more of a warm up, and I set the play head far back, and play along with the recording blissfully and let qtractor do the punch in and out.
When you are ready, press Spacebar or click the Play button in the toolbar, and playback will begin. Between the blue range margers, qtractor will record the new take.
You can send the punch-in recording to any track you want; this way you can do multiple takes of your punch-in and then choose between the best of them.
Exporting
All that's left to do now is to export your project. First we should set our destination format, which is done via the Options window -- found in the View menu > Options, or by pressing the default hotkey F12.
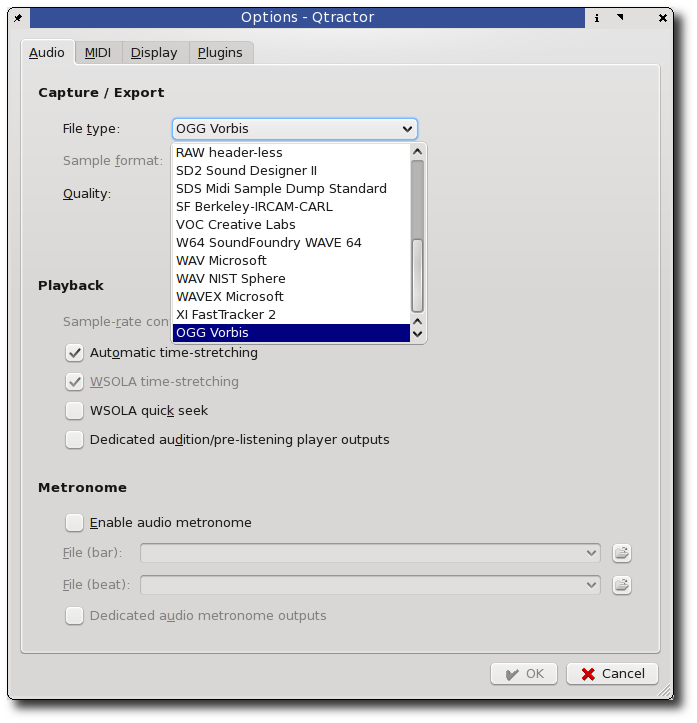
In the options window, you can set the export format and quality. There are many formats available, and their associated options become available when they are selected. For compressed audio, I use Ogg Vorbis. By default in 0.4.1 there is no compressed format that is really widely played on typical media players [read: something from mpeg], so if you need something other than Ogg to distribute, then you'll need to export as uncompressed audio and use sox or ffmpeg or mencoder to produce, for instance, an mpeg4 audio file, or aac, or whatever.
The options window has many more options aside from just setting export format and quality; click around and see if there are other settings you'd like to change.
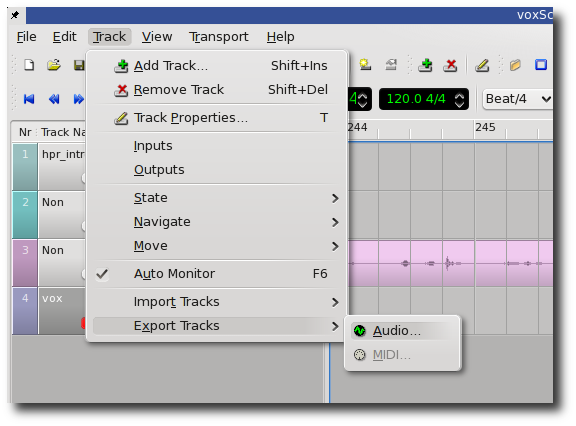
Now you're ready to export; I assign 'E' to exporting, but you can also go to Track > Export Tracks > Audio. Tell qtractor where to save the output file, and sit back while qtractor bounces the sound to a file.
Summary
Qtractor is a great application that will continue to develop into what could be the premier digital audio workstation for Linux. As you can tell from this tutorial, it's easy to use but quite powerful, and far enough in its development to produce serious audio work. There are some missing features, but it's a pleasure to use nevertheless and will surely become an important part of multimedia-on-Linux.
Finished this tutorial? Try out the next one on using MIDI soft synths in Qtractor.
This tutorial is by notKlaatu, and it's released under some kind of GPL-friendly documentation license..like GNU Documentation License or something like that.