Understanding Linux Audio
TL;DR
- Identify Physical Devices
- Identify Sound Cards
- Map Sound Devices to their Controls
- Set Up Kmix
Traditional Linux (such as Slackware, and as opposed to something more progressive like Red Hat and Fedora) deals with audio in its own unique way. This can be confusing to new users, or to experienced users who have never thought about it. It confuses people because almost no where in the audio schema is there a one-to-one mapping; you must think of audio processing in the computer as a series of rivers or streams, flowing from one or two sources internally, branching off one other for adjustment, and then re-joining at the end to deliver sound in the physical world.
The background and history of how and why is unimportant to actually using it, so this is a pragmatic overview of how and why Linux audio does what it does, and what you need to understand about it in order to control it.
You should read this even if you boot into Slackware and find that your sound just works.
1. Identify Physical Devices
The first step in forming a meaningful bond with the audio system of your computer is to do a full system scan of its audio devices. This sounds like it is a complicated technical process, but actually it's entirely non-technical:
- Sit down in front of your computer.
- Unplug any peripherals (the display notwithstanding).
- Take an assessment of each physical audio port.
Laptops
On laptops, the first thing you will probably notice is a headphone port and a microphone line-in. These are analogue audio ports.
Sometimes, unfortunately, a laptop design combines the headphone OUT port and the microphone IN jack. This not only cheats you out of versatility but it gets very confusing on the software side, so take special note of it should you have such a combined port.
Most laptops have, in addition to the audio ports that you see right away, inbuilt input and output: that is, a microphone (usually intended for use with a web cam) and speakers.
And finally, many laptops have HDMI or other digital audio outputs. You may or may not intend to use these, but you will need to account for them in software, so take note.
Desktops
On desktops and workstations, there are usually ports on the front and rear panels. For instance, you might find a headphone port and a microphone line-in for easy access in the front panel, and then six or seven more analogue audio ports in the back, usually meant to provide some degree of surround sound (or at least a left, right, and center channel).
Additionally, your desktop may have an HDMI port or other digital audio output. You may or may not intend to use these, but you will need to account for them in software, so take note.
2. Identify Sound Cards
TL;DR
Check your sound cards with aplay -l. The first one listed is where your sound goes to by default.
Now that you know the tributaries, you must go further up the river, as it were, to find the sources of the sound that is distributed to all of the different physical ports. Your computer may have 5 or 6 physical ports for sound devices, but usually all of those ports are wired back a single sound card (which are not always a separate card from your motherboard, so opening the computer and looking at internal components is not always as obvious as you might think).
To find out just how many sound cards you have, open a terminal a use aplay (for outputs) and arecord (for inputs) to find out how ALSA (Advanced Linux Sound Architecture) views your hardware:
bash-4.2# aplay -l
List of PLAYBACK Hardware Devices

card 0: SB [HDA ATI SB], device 0: ALC887-VD Analog [ALC887-VD Analog]
  Subdevices: 0/1
  Subdevice #0: subdevice #0
card 0: SB [HDA ATI SB], device 1: ALC887-VD Digital [ALC887-VD Digital]
  Subdevices: 1/1
  Subdevice #0: subdevice #0
card 1: NVidia [HDA NVidia], device 3: HDMI 0 [HDMI 0]
  Subdevices: 1/1
  Subdevice #0: subdevice #0
card 1: NVidia [HDA NVidia], device 7: HDMI 1 [HDMI 1]
  Subdevices: 1/1
  Subdevice #0: subdevice #0
From this sample output, we learn that this computer has two physical cards, feeding four different groups of ports. In this example, we can deduce that the first card, card0, is the motherboard, analogue sound system that feeds the analogue headphone and speaker ports. We can further deduce that the second card, card1, refers to the graphics card, not only because it is clearly labelled as NVidia but also because it is labelled as being HDMI.
List Order is Significant
TL;DR
Change default sound card settings with a .asoundrc config file.
The list being provided here is not arbitrary or just the order in which your computer has detected the audio devices. The first listed card (card0) is marked as the default destination for audio. That seems fine, as long as your audio is working as expected, but it becomes problematic if your desired default happens to be different (for instance, if you want to use HDMI for all your audio).
If you need to change the order of sound card dominance, create the file .asoundrc file in your home directory and tell your audio system to use a different card as its default.
Here is an example of an .asoundrc file that promotes the second card to be the default device:
defaults.ctl.card 1
defaults.pcm.card 1
defaults.timer.card 1

pcm.!default {
type hw
card 1
device 0
}

ctl.!default {
type hw
card 1
device 0
}

pcm.dsp {
type plug
slave.pcm "dmix"
}
Log out of your desktop session and log back in (or reboot if you prefer) and now the default sound output has shifted.
3. Map Sound Devices to their Controls
At this point, you have identified the sound cards in your system, and you have set which card is the default card. Now it's time to look at the software sound controls provided to you on your Linux desktop so that you know which control to use to raise, lower, and mute sound.
If you are used to a system that provides you one over-all volume control for everything, then the Linux desktop sound controls are bound to confound you. On a laptop, you might find that even with a mere three output ports (speakers, headphones, and digital) spread across two cards, you still have upwards of six different playback controls. On a desktop, those numbers each go up exponentially.
The reason for this, again, is that there is no 1:1 map between sound ports and the software that uses them. For example, one headphone and one stereo speaker output affords the opportunity to control at least (1) the headphone volume, (2) the speaker volume, and (3) all output (both the headphone and speaker) together: three controls for two physical outputs (that's without considering users who want left and right channels on separate controls). Take that example and apply it to a surround sound setup, and you begin to see the complexity of what is offered to a user.
Since Slackermedia cannot know your requirements, it's up to you to determine your ideal control scheme, but the first step is to understand which volume slider controls which sound port. The most efficient way to investigate this is alsamixer, which, unlike Kmix displays, for better or for worse (and for this use, it's better) every possible volume slider all in one screen.
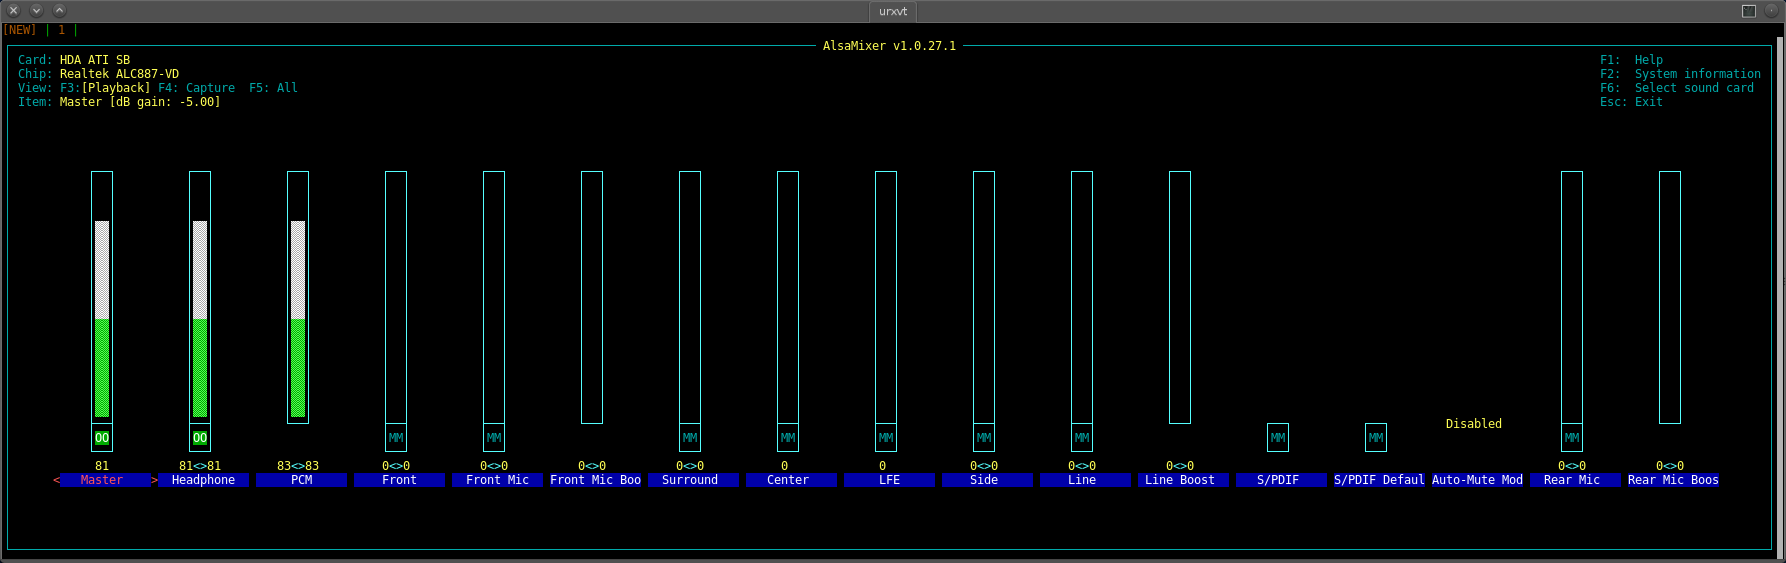
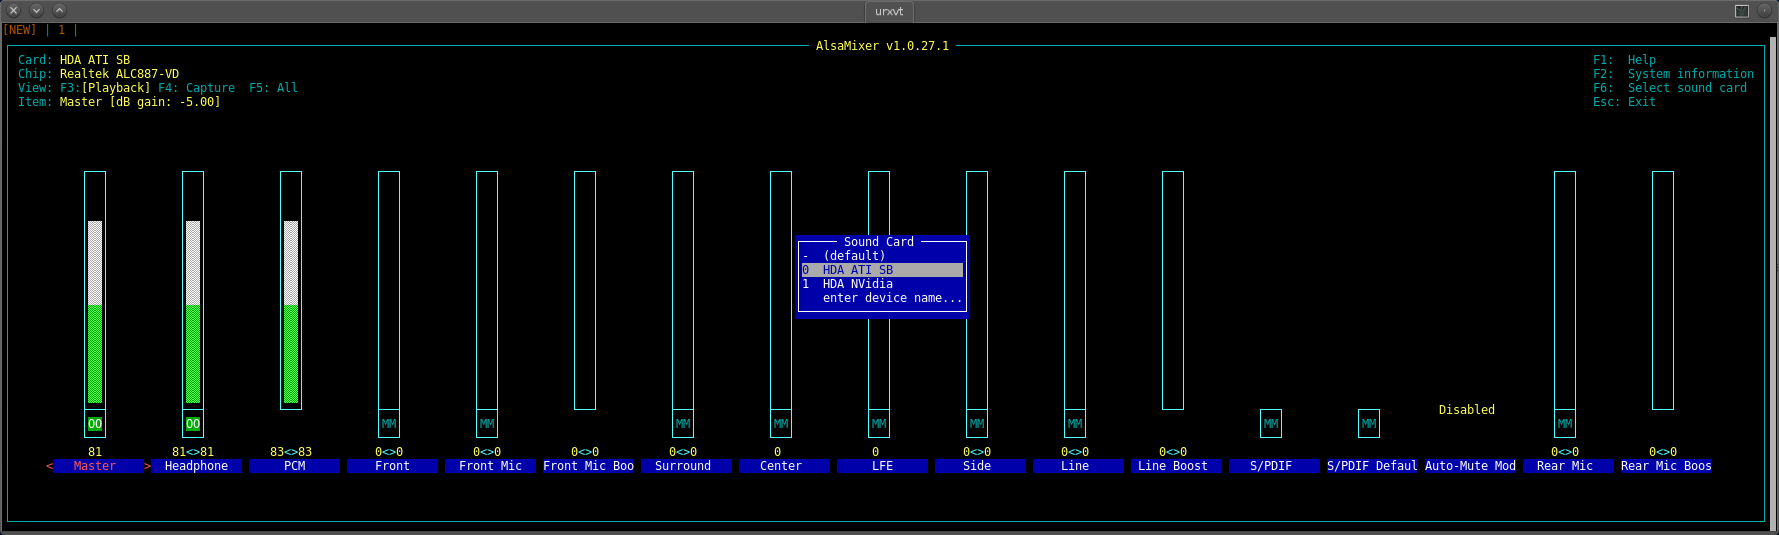
To begin, set up your speakers as you intend to use them, and have headphones (or something with a 1/8“ (3.5mm) audio jack) on hand. Press F6 on your keyboard to select the audio card you want to control and select the appropriate card.
Launch System Settings from the K-Menu and navigate to the Multimedia panel. In the Multimedia panel, promote the card that you want to use as default to the top of the list on the right, and click the Test button at the bottom of the panel. The Test button plays a sound that should be audible when you raise the volume of the appropriate device.

If you are not sure what device to promote to the top, check the output of aplay -l again. In this example, notice that the default analog card0 listed by aplay -l is ALC887-VD Analog, and the port promoted in the Multimedia panel is the same.
Using the left and right arrow keys to navigate to each control, the up and down arrow keys to raise or lower the volume, and the m key to mute or unmute the device, see which volume slider effects which device.
Goal
Your goal is to determine what volume slider (by name) affects each sound output that you intend to use on a regular basis, as well as what volume slider controls groups of devices (ie, unless you are a DJ, you may never have a need for separate volume control for speakers and headphones).
It seems obvious, but is easily forgotten in the moment: when you find a volume slider that affects a device, leave the volume up, or else you will have lowered the sound stream and it will seem like no other slider works.
Press the F4 key to switch from Playback (output) to Capture (input), and repeat the same process to determine controls for your input devices (microphones).
Combined Port Exceptions
If you found, when you were assessing the physical ports, an audio port that served both as an output and input ports, you must pay special attention to the mute status of the capture device; if the capture device is muted, then the audio port will not work as a capture device but it will work as a playback device. If it only is muted as a playback device, then it will not work for output, but the input will work. In other words, you will think that you have unmuted the port, but you will forget that you have unmuted it for one purpose and not the other.
4. Set Up Kmix
At this point, you have identified the ports-to-controls on your system, so you could potentially stop here. However, alsamixer may not be convenient for you, so if you prefer total desktop integration, configure the Kmix application in your system tray.

To configure Kmix, click the speaker icon in your system tray and then click the Mixer button at the bottom of the drop down panel.

When the default configuration of Kmix appears, click the spanner button in the lower right corner of the window.

In the list of available devices that appears, move over any controls (the names should match those from alsamixer) to which you want quick access. Verify that they work as expected.
To select what control you want to use as the systemwide master volume level, click on the Settings menu and select the Select Master Channel option. Set the master channel to whatever volume slider it is (usually it is labeled Master or PCM) that controls all devices, or if you have other needs, then set it to whatever device you want immediate, default control over.

If you only want one volume slider to control you entire system's sound, then use only the Master channel slider in the Kmix interface. Doing this does not mean you have no control over other devices, it only means that you will have instant access to the master channel control.
Capture
If you use the microphone on your system frequently, then add the appropriate Capture channel to Kmix as well.
Take care not to leave the capture device in an unmuted state; many recordings have been compromised because a user has left both their inbuilt microphone and their outboard microphone active.
Hijack
If you want to record everything you hear from your computer speakers from a system-wide perspective, refer to parecord
Outboard Gear
You now have a configured system, and hopefully you understand your computer's sound system better than ever. If you use outboard gear, like a sound interface or a USB microphone, then those will just appear in Kmix as additional streams to control. From Kmix, you'll be able to mute, add and lower levels, and the presence of the devices will be fairly obvious since they are additional peripherals to the self-contained system that you have just analysed.
The KDE desktop itself will warn you when outboard devices cannot be found. These warnings are safe to ignore, or to deactivate. Outboard gear is dynamically handled,